User Guide
Quick Reference
Modding
Development
User Guide
Quick Reference
Modding
Development
This article focuses on how to create a texture resource pwad for use when mapping that takes advantage of the doomsday engine's high resolution (hi-res) texture features. The method presented here can be used for all games playable under the Doomsday engine (e.g. j_doom, j_heretic and j_hexen).
The Doomsday engine supports the use of high resolution (hi-res) textures, in various formats; TGA and PNG; 8, 24, and 32 bit and more. Note that TGA files always must be saved as 32 bit; even if no alpha information is used. A 32 bit file is a 24 bit image with an 8 bit grayscale alpha channel that is used to define transparency. Areas of the alpha channel that are white are opaque; areas of the alpha channel that are black are transparent. The grey values in-between denote different levels of these two extremes. You'd only want to use a texture with an alpha channel on a two-sided linedef.
It is recommended to use PNG files whenever possible for the added flexibility of utilizing 24 bit when an alpha channel is not required. File sizes of the PNG format are also smaller.
Notes: This how to assumes that you have some familiarity in creating new textures for the DOOM engine. I'll summarize the process shortly.
This guide also uses the terms folder and directory. Normally, these two terms are synonymous and can be freely interchanged. Different utilities use different syntaxes. I'll try to use the same term the utility uses.
In regular DOOM, textures are created by combining one or more patches. Patches are the actual graphic; the texture lumps are really just lists that define which patch or patches the engine needs to use to create the composite graphic (texture) that you see on the sidedefs (walls) in the game. All patches must be created by using an 8 bit (256 color or paletted) graphic; furthermore, you must quantize the image to the DOOM palette (a predefined 256 color map or palette—some PWAD utilities will do this for you).
A texture can be created from just one patch, but interesting textures can be created by using two or more patches. The texture lists contain paramaters such as the canvas size of the texture e.g; 128×64, 128×128, 256×128… etc. Note that the canvas size must be multiple of 2. The z-order of the patches (which patch is placed on top of which other) and the [x, y] offset of a particular patch. The entire canvas must be covered by at least one patch, for example; You should not use just one 64×64 patch to build a texture that has a 128×128 defined canvas size. You would need to add that patch 3 more times to cover the entire canvas.
When loading a texture, Doomsday will first look for a hires version and if found, it will be used in it's place. All textures can be replaced in this way, regardless whether they originate from an IWAD or PWAD. The one requirement is that the file name of the hires texture (e.g. shawn1.png) name matches a name in the texture lists (e.g. SHAWN1), note the names are not case-sensitive and that it is the name of the composite texture and not a patch. If found, Doomsday bypasses the usual texture compositing method (building a texture from multiple patches) and instead uses the hires texture as one complete patch that covers the texture canvas.
For example, if you had a texture defined (named) as mrblerck consisting of three patches; granite1, mrble1 and mrble2 and you wanted to use a hires PNG file in its place, you would simply need to find/create a PNG file and name it mrblerck.png and place it in the folder that Doomsday requires texture replacements to be.
Notes: In jDoom's case this location would be /data/jdoom/textures.
Another important thing to realize is that the engine will scale your hires texture to the exact texture canvas size. So, a 256×256 PNG file in all its detailed glory will be scaled to 64×64 in the game if the canvas size is 64×64. This is precisely how the higher resolution is achieved.
Ok, so knowing how this works, there should be a nagging little question in the back of your head, and that question should be:
“If Doomsday only uses the TEXTURE1 entry for determining the name and size of the texture but does not use any of the patches; Couldn't I just create all the TEXTURE1 entries using one simple little reference patch?”
Not surprisingly, the answer is yes. Furthermore, it is possible to use a patch name which is a zero-length lump and Doomsday will not care. This means you can save a lot of space in your PWAD.
“Ok, smarty, but what about the editing process? Shouldn't I have something in there when doing texture alignment and stuff?”
Ok. Yeah. You have a couple of options. You can use a simple reference patch that has a grid reference at 16, 24, 32, 64, 128, 256, etc. You can use this over-sized patch to create textures. Incidentally, for Doomsday, you can use one patch to create a texture that has a canvas size larger than the patch itself. That is legal to do in this example; since the engine is bypassing the patch anyways; it never has an opportunity to display it incorrectly in-game.
Ok, let's get on with it, then.
Here follows a list of the tools used throughout this how-to. You are not obligated to use them and are free to use any comparitive tool but be prepared for the fact that this article's step by step guide will be of diminished benefit.
Notes: Some editors may not work or load a PWAD that contains texture1 entries made up of a small reference patch, or in one example above, a zero-length patch (marker). Some editors may even require you to use a patch that is quantized to the DOOM palette. Although note that some PWAD utilities may do that quantizing for you as long as the input format conforms to what it is expecting for a patch (8 bit PCX file or BMP file for example).
The newest version of XWE now handles “blind” entries and assumes you know what you're doing; if you actually do put in an 8 bit PCX or BMP, it will quantize it to the DOOM palette; but, if you put in a 24 bit patch (from a PNG file or something), it'll take that too‚Äîit just won't display it in the preview window. But we're getting off-track, here. But I'm going to request that you add a small mental bookmark to what I just said I'll revisit this at the end of the tutorial.
Start XWE and create a new PWAD, we'll call it textures.wad.
I'm now going to choose to use a 256×256 reference patch that is already using the DOOM palette. This will ensure that it will show up in your editor. If you're feeling brave, for extra credit, you can simply create an entry and place it between the two markers above, and use that null (zero-length) entry to build (the fake) textures with that JDOOM will replace with PNG files later. Just note that when you select these “textures” in Doom Builder, for example, the wall will be completely black, as it can't even display a valid patch, even though the texture will show up in the textures list. Not real helpful for texture alignment purposes.
Here's the patch:
Notes: The DOOM WAD format requires lump names to be at most eight characters in length.
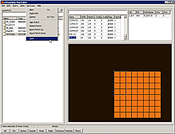
XWE has done a few things automatically for you. It's named the first new texture M_PATCH (as we discussed above), and it automatically determined the canvas to be equal to that of the dimensions of the patch. These two things are not required to stay that way at all, and we can adjust these values at any time. Let's do that now…
Notes: The patch is over-sized in comparison to the canvas size of the texture. That is OK. Furthermore, it won't make much of a difference when you're editing (you'll just see the first 4 grids of this patch (each grid is 16 pixels square)).
We won't be seeing this texture in-game, however. We'll see the PNG file we name TUT_01 in the jDoom textures directory.
Let's get a PNG file ready to go. The canvas size in the texture1 list means that the PNG file we use will be scaled to fit on any SideDef that is 128 long and in a sector that is 128 units tall. Obviously, it will be partially displayed if your SideDef (and sector height) is less than 128 units and tiled if your SideDef (and sector height) is more than 128 units. The important thing to realize is that if you create a PNG file that is 256×256 and name it TUT_01, the engine will SCALE the PNG file to match the canvas size.
It's not necessary to match sizes between PNG files and texture1 canvas sizes, just know the rules that will apply in either case.
Here's the high resolution texture that I'm going to use in this example:
Ok. Let's do another texture. Here's where it gets pretty easy.
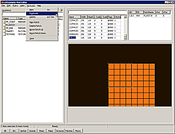
 From the Texture Menu (if you're not in Texture editing mode, simply click once on the texture1 lump), highlight the TUT_01 entry and then from the File Menu, choose Textures From the Texture Menu (if you're not in Texture editing mode, simply click once on the texture1 lump), highlight the TUT_01 entry and then from the File Menu, choose Textures | Duplicate. |
 Rename this new texture to TUT_02. Let's modify the canvas size of this texture to 64 wide by 128 tall. After we change these values, be sure to select Textures from the File Menu and select Save. Rename this new texture to TUT_02. Let's modify the canvas size of this texture to 64 wide by 128 tall. After we change these values, be sure to select Textures from the File Menu and select Save. |
Now let's get a PNG file that we're going to use as that texture. Although the dimensions do not need to be exact, the ratio should be. For example, we could use a PNG texture of 128×256 and it will scale appropriately. For my example, I'm going to use a PNG texture that is 128×256. Here it is:
You can repeat this process for each and every new texture you want to create for your project. Flats
Let me talk about flats quickly. If you're using Doom Builder version 1.5 or higher, you can use XWE to create zero-length entries between FF_START and FF_END in your PWAD. The names of the flats will show up in Doom Builder's Flat Resource List (although it will be displayed as a black square). I recommend actually creating DOOM-paletted 64×64 versions of your flats in the editing process and then afterwards, you can choose to change them all to zero-length entries. This makes “seeing” your level in the 3D mode of Doom Builder a little easier; otherwise, the floor and ceiling will display as black.
Another option is to use 64×64 24 bit PNG files as flats. Doom Builder 1.53 will display them fairly correctly.
In either case, it's not what's really in the PWAD that will show in the game. You'll want to use PNG files similarly to the way we did textures. The only difference is “flat-” must precede the flat name. So, if we created a flat called flr_foo between the FF_START and FF_END markers in a PWAD, our PNG equivalent would need to be named flat-flr_foo.png. All PNG files for textures and flats need to be located in the /data/jdoom/textures folder. DOOM's engine, and therefore JDOOM's engine uses a 64 pixel grid for all flats. If you have a 128×128 PNG file that will become a flat, it will scale to fit the 64×64 grid. For the sake of completeness, let's create a custom hi-res flat.
Now, let's import a simple placeholder Flat that uses the DOOM palette. For my example, I'm going to resize (resample) my hi-res PNG file and make it a 256 color bitmap that uses the DOOM palette. It might not look pretty, but at least it will show up in XWE.
NOTE: I could just put in the PNG file between the markers, as Doom Builder would display the PNG flat, but other editors may not support PNG files. So, let's just do it this way for now
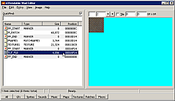
There's one additional, important step that you need to do so that XWE understands that it is a true DOOM flat. This step is really only necessary if you used a 256 color PCX or BMP file that utilized the DOOM palette on Entry | Load.
 This changes the entry to a 4096 byte-length entry that DOOM will recognize as the appropriate lump for flats. This changes the entry to a 4096 byte-length entry that DOOM will recognize as the appropriate lump for flats. |
Notes: I have noticed a small issue with XWE version 1.12. Sometimes it will actually make your FF_END marker the flat, changing that marker from zero bytes to 4096 bytes. I have no idea if this is something I am doing wrong, or a bug with XWE. If that's the case, simply delete that FF_END entry and make a new one, or change the length to zero bytes. You may have to try to make your TUT_FLR a DOOM flat again. Not a huge deal, just a bit strange. Including working on this tutorial, it's happened to me only once before.
Ok. Now it's time to package all of this up and get it into the hands of the user. Let's assume that you have all the new textures and flats you need, and that you've already made your map.
The preferred way to distribute JDOOM specific content is using a PK3 file.
A PK3 file is just an uncompressed ZIP file. Although you can just keep the ZIP extension, it's better to use PK3 and associate PK3 with WinZip. Upon distribution, you then use WinZip or whatever archive application you would like to use, to compress the PK3 file.
JDOOM requires things to be in certain folders. If you didn't use the PK3 file, then here's where things go:
The MAP PWAD resides here: /data/jdoom/auto
The TEXTURE PWAD resides here: /data/jdoom/auto
(Yes, they can be merged into one PWAD if you so desire.)
The PNG files reside here:
/data/jdoom/textures
The point of PK3 files is so that you can release the file with a virtual folder structure so you don't require the end user to have all these files all over the place. As long as your PK3 file (zip file renamed to PK3, basically) uses no compression (also known as “store”), then JDOOM will handle it correctly and interpret the virtual folder structure.
Although you can use WinZip to build your PK3 file, it does not allow you to dynamically create folders within the archive. That's why I recommend PakScape. Version 0.11 is the most recent (final?) version of this great program.
I won't burden you with too many screenshots, but here are the steps.
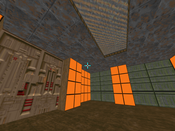
 Using DoomBuilder's 3D mode, you will notice that our hi-res texture replacements are not actually visible and instead, it is the place-holder patches that can be seen. It can be noted however, that the grid pattern on the place-holder patch we have used is actually rather helpful for the purposes of texture alignement (albeit, in our example rather non-descript). It is left as an exercise for the reader to experiment with different designs. Perhaps this basic design could be improved using gradients?
When playing this PK3 file in jDoom, it can be loaded with the file command_line_option, or simply drop it into your /data/jdoom/auto folder and it will be automatically loaded at runtime.
And that concludes this how-to on using custom, high resolution textures under Doomsday, with jDoom and how to construct a texture resource PWAD for use when building a map.
\write me